RDF Equipment Ideas for On-Foot VHF Foxhunting and Radio-Orienteering
Adapted from a handout given to first-timers at southern California two-meter international-style foxhunts. This information is primarily for the Amateur Radio two-meter band. For 80-meter band ARDF equipment, read Try ARDF on 80 Meters at this Homing In site.
Easy Ways to "Sniff" Foxes on Two Meters
There is no "standard" two-meter RDF setup for on-foot use by hams in the USA. Every ham who is experienced at it has his or her own idea of what
works best in a given situation. Try the various methods described below and
see which ones you like most.
Handie-Talkie Tricks
If you are a typical ham radio operator, all you need to get started quickly and find foxes successfully is your VHF/UHF handi-talkie (HT) or scanner and some simple accessories. The most
elementary way is called the "body fade" or "body
shield" technique. Hold your HT tight against your chest and turn around
slowly, looking for the direction at which your body blocks the signal most
effectively (the signal null). At this point, the signal is coming from behind
you. Walk in the direction of the null, taking bearings at regular intervals, and observe the signal strength get stronger.
When the signal is so strong that you can't find the null, tune 5 or 10 KHz
off frequency to put the signal into the skirts of the receiver's IF passband. If your
hand-held is dual-band (144/440 MHz) and you are hunting on two meters, try
tuning to the much weaker third harmonic of the signal in the 70 cm band while
performing the "body shield."
 Disconnecting the HT's "rubber duck" antenna will knock down the signal even more. Hearing the signal with antenna off is usually a "You are here!" indicator. Some foxtailers wrap aluminum foil around their HTs to attenuate the signal even more. If you do this, be sure to put insulating tape over the battery charging terminals on the bottom of the set first. You might damage the radio by shorting these terminals with the foil.
The "body fade" null, which is rather shallow to begin with, can be filled in by
signal reflections (multipath), nearby objects, etc. When using this method, stay away from large buildings,
chain-link fences, metal signs, and the like. If you do not get a good null,
move to a clearer location and try again.
Using Directional Antennas
You'll get much more accurate bearings, plus more sensitivity when hunting weak signals, if you use an antenna with forward gain and directivity such as a yagi, cubical quad, or phased array. The technique is simple, just point the antenna toward the horizon and turn your body in a 360-degree circle to find the direction in which the signal is strongest, just as if you were turning a rooftop TV antenna for best picture. When signal strength is greatest, the high-gain antenna is "pointing" toward the signal source. You could remove and carry
the 4-element yagi or quad that you normally use for mobile T-hunting, but it's
rather large and cumbersome. You don't need that much gain and pattern
sharpness --- two or three elements will do nicely.
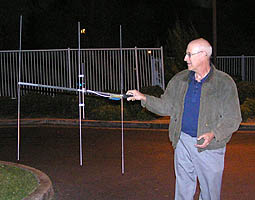
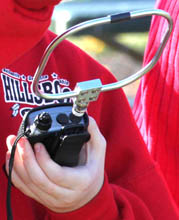
A good ready-to-hunt choice for two meters is the 3-element yagi by Bob Miller Enterprises (above right). Element rods fold along the boom for easy storage and transit. Each antenna is hand-built and tuned for best match by N6ZHZ.
For close-in "sniffing," consider the Shrunken Quad on pages 173-176 of the book Transmitter Hunting--Radio Direction Finding Simplified (THRDFS). It is more compact than
a yagi or phased array and is safer because it does not have long pointed
elements. It is somewhat tricky to tune and has a narrow bandwidth (about 500
KHz), but it is an excellent choice if most of your hunts are on one frequency such as the southern California
coordinated transmitter hunt frequency (146.565 MHz).
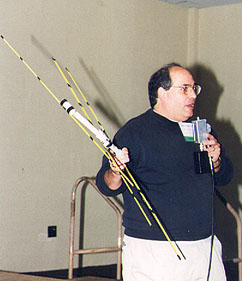
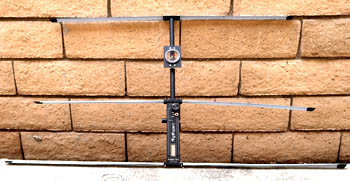
 Today's favorite home-built two-meter radio-orienteering beam among newcomers is the 3-element yagi design from the WB2HOL Web site (Wayback Machine). The photo at right shows Joe Leggio WB2HOL (SK) demonstrating this antenna at Hamvention. It's a simple project made from a steel measuring tape, PVC pipe, hose clamps, and a "hairpin" match to the coax. The steel tape measure elements fold gracefully for convenience and safety as you crash through the brush at running speed. You can build this antenna from scratch using parts from your local hardware store, or get an inexpensive kit from Marvin Johnston KE6HTS. Some mechanical construction improvements and storage tips by David Deane G3ZOI are here.
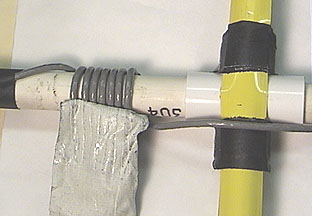
The directional pattern of WB2HOL's 3-element beam is pretty good, but users have noted that feedline signal pickup can make bearings unreliable by moving the maximum lobe off-axis. I recommend adding a "choke" balun in the coax line (photo at left) to minimize RF current on the exterior of the feedline. Wrap about 7 turns of the feedline (with jacket in place) around the boom behind the reflector. (It will not work as well if you put the turns between the driven element and the reflector.) Cover with duct tape or cloth tape to keep the turns in place. (Tape was partially removed for the photo.)
The biggest problem with two-meter RDF yagis is how to hold onto them while beating the bushes for hidden transmitters. Grasping the middle of the boom is awkward and it introduces body capacitance that may affect antenna performance. Using the extension of the boom behind the reflector as a grip solves the hand-in-the-antenna problem, but it is even more awkward because the entire antenna pulls the hand down at the wrist. Most pre-teens cannot hold an antenna this way for more than a minute.
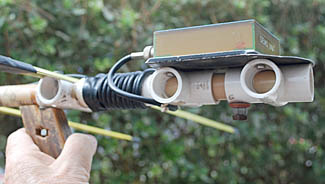 A handle at the balance point of the boom keeps body parts out of the field of the beam and eliminates torque on the wrist. The photo at right shows a yagi by Clarke Harris WB6ADC (SK) with a wooden handle bolted under the boom and a platform for mounting the receiver behind the reflector.
3D printing is an inexpensive way to fabricate RDF antenna parts such as handles, element clamps, attenuator enclosures and radio holders. The 3D Printed Parts page in this Homing In Web site has resources including links to projects and STL files.
Closing In
At the start point, you can usually use your handi-talkie's S-meter to take bearings with
your RDF antenna. When you get so close that the S-meter goes off scale, you will need to reduce (attenuate) the signal into the receiver. Simple resistive RF attenuators that are commonly used
for mobile hunting are of limited use because the signal will bypass the
attenuator and go through the receiver case by the time you have put in a
few attenuation steps.
If you have a dual-band hand-held, you get will the equivalent of 40 to 60 dB
attenuation by tuning it to the third harmonic of the hunt frequency. A small
UHF yagi or quad will give sharp bearings on the hidden T's third harmonic when
you are within a few dozen feet.
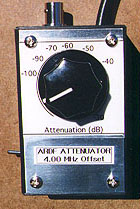 The favorite signal reduction device of on-foot foxhunters with beams is an "active," or "offset" attenuator. It converts a strong on-frequency signal into a weaker off-frequency signal, typically 4 MHz up or down the dial. To use it, tune your receiver to the offset signal, then adjust the attenuator for the needed
attenuation, from 20 dB to 100 dB or more. Signal leakage into the receiver case is not a problem with this kind of attenuator.
The favorite signal reduction device of on-foot foxhunters with beams is an "active," or "offset" attenuator. It converts a strong on-frequency signal into a weaker off-frequency signal, typically 4 MHz up or down the dial. To use it, tune your receiver to the offset signal, then adjust the attenuator for the needed
attenuation, from 20 dB to 100 dB or more. Signal leakage into the receiver case is not a problem with this kind of attenuator.
A popular crystal-controlled circuit (see photo at left) is fully described in this Homing In Web site. (Build an Offset Attenuator) You might find everything you need for this home building project at your local electronics parts store for about $15, or you can buy a partial or complete kit or an assembled/tested unit.
What ARDF Champions Use
You might think that all competitors in an international foxhunting championship should be required to use the same type of receiving equipment and that all sets
should give identical performance. But that's not practical. Equipment preferences and availability
vary greatly from country to country. The IARU rules for
championships instruct all entrants to bring their own gear. Any type of RDF set
is allowed, so long as it can be carried by the contestant and does not radiate
any signals that would interfere with the hunt.
It's possible to do very well in multi-nation ARDF events with your HT or scanner, beam, and offset attenuator as described above. But the majority of experienced radio-orienteers eventually opt for a lightweight one-piece receiver/antenna set with added features such as tone-pitch signal-strength indicator. No such sets are commercially manufactured in the USA at this time, but they are available from foreign sources in kit or wired/tested form.
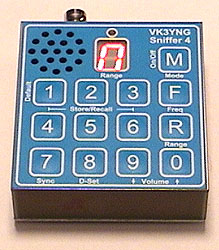 The most popular one-piece set among ARDF Team USA members is
the frequency-synthesized Sniffer 4 from Bryan Ackerly VK3YNG in Australia (photo at left). It covers both the full two-meter band and the 120-123 MHz aircraft band with selectable AM, FM or audio S-meter tone output to the loudspeaker. You can listen to both the receiver audio and S-meter tone at the same time with stereo earphones. It includes automatic-ranging attenuation in 15 dB steps. For multiple-frequency hunts, there are six programmable memories. Sniffer 4 is lightweight and easily attached to the RGE VHF-144 antenna (see below) or a home-built measuring-tape beam. Cost with shipping to the USA is just over US$200. A detailed product review by KØOV is in Homing In for Fall 2007 issue of CQ-VHF Magazine. Sniffer4 is available directly from Bryan Ackerly in Australia and is also sold by Bob Miller Enterprises in California. (Due to parts sourcing problems, this unit may be unavailable from time to time.)
The most popular one-piece set among ARDF Team USA members is
the frequency-synthesized Sniffer 4 from Bryan Ackerly VK3YNG in Australia (photo at left). It covers both the full two-meter band and the 120-123 MHz aircraft band with selectable AM, FM or audio S-meter tone output to the loudspeaker. You can listen to both the receiver audio and S-meter tone at the same time with stereo earphones. It includes automatic-ranging attenuation in 15 dB steps. For multiple-frequency hunts, there are six programmable memories. Sniffer 4 is lightweight and easily attached to the RGE VHF-144 antenna (see below) or a home-built measuring-tape beam. Cost with shipping to the USA is just over US$200. A detailed product review by KØOV is in Homing In for Fall 2007 issue of CQ-VHF Magazine. Sniffer4 is available directly from Bryan Ackerly in Australia and is also sold by Bob Miller Enterprises in California. (Due to parts sourcing problems, this unit may be unavailable from time to time.)
Some other foreign-made 2-meter ARDF sets you may encounter:
 The new FoxRex144 from RigExpert in Ukraine (at right) is a full-featured AM receiver and measuring-tape yagi with attached compass. The receiver, designed by Nick Roethe DF1FO, has 12 frequency memories and built-in timers for five-fox classic and other ARDF events such as foxoring. A built-in lithium battery with charger provides power. This plug-and-play set covers 144-146 MHz as shipped, but can be changed to 144-148 MHz in the Settings menu. A review of this unit was in my Homing In column in CQ Magazine for May 2019. Due to the war situation in Ukraine, Rig Expert products may not be available at this time.
In the Czech Republic, OK2BWN Radio Sports Equipment is selling SuperFox two-meter ARDF sets with an HB9CV-style two-element beam and superheterodyne receiver powered by a NiMH rechargeable battery. The SuperFox145E has continuous tuning and the SuperFox 145DX has a digital synthesizer. Note that these receivers tune only 144-146 MHz and have AM detectors.
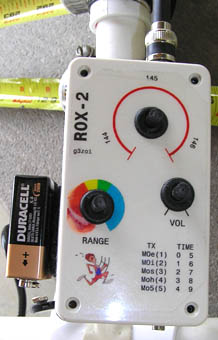
From the United Kingdom, the ROX-2T receiver project (photo at left) by David Deane G3ZOI has varactor tuning and AM detection, ideal for European/Asian 2m hunts. The simple circuit uses an TA7613AP AM receiver chip and two other ICs. Plans are on the Web. Kits or assembled units may be available from time to time; contact David directly for information.
 Many foxhunters in former Soviet Union countries still use 80's-vintage RDF sets made
at the Barnaul Radio Factory in southern Siberia. The Russian Altai-145 is a
complete two-meter receiver/antenna unit in one piece. The AM receiver is
built into the boom of a 3-element steel tape yagi.
There is no FM detector or BFO, but it has a quencher
circuit that interrupts the signal at an audio rate to create an audible tone
in the user's headphones. There is
no S-meter and frequency coverage is only 144-146 MHz. Sensitivity is low, approximately 7 microvolts threshold. Pre-owned Altai-145's are occasionally available at "street prices" of US$80 to US$100.
Many foxhunters in former Soviet Union countries still use 80's-vintage RDF sets made
at the Barnaul Radio Factory in southern Siberia. The Russian Altai-145 is a
complete two-meter receiver/antenna unit in one piece. The AM receiver is
built into the boom of a 3-element steel tape yagi.
There is no FM detector or BFO, but it has a quencher
circuit that interrupts the signal at an audio rate to create an audible tone
in the user's headphones. There is
no S-meter and frequency coverage is only 144-146 MHz. Sensitivity is low, approximately 7 microvolts threshold. Pre-owned Altai-145's are occasionally available at "street prices" of US$80 to US$100.
Other VHF RDF Devices, Commercial and Home-Built
The sensitivity of your two-meter ARDF equipment should be about the same as that of a typical handie-talkie. In an international championship foxhunt, the first transmitter will be at
least 3/4 of a kilometer from the starting point, running as little as 250
milliwatts. Tuned or untuned field strength meters (such as the Sniff-Amp on pages 173-176 of THRDFS) and
commercial "bug detectors" do not have sufficient sensitivity to hunt at this
distance. However, such low-sensitivity units can be helpful when you are a few yards away
from a well-concealed transmitter and you can't get enough attenuation with
your sensitive equipment.
The following sets all have sufficent sensitivity for most on-foot foxhunts, but they are not as popular as the directional-antenna units methods above. They are useful when coverage outside of the Amateur Radio bands is needed, because yagis and quads have accurate directional properties over just about a 3% frequency range
AM-based Dual-Antenna Sets
Little L-Per dual-pattern RDF sets by L-Tronics are no longer made but are still popular with search-
and-rescue teams that hunt Emergency Locator Transmitters in the wilderness. An L-Per consists of a dual-dipole antenna set, switcher, and receiver with
attenuator and zero-center meter. It has two modes for RDF. The switched mode
gives a very sharp left-right indication on the meter, making it easy for the
user to walk the bearing line toward the transmitter. In the non-switched
mode, the antenna performs like a two-element phased array and the meter reads
signal strength; this is better for very weak signals.
The sharpness of the zero crossing indication in the switched mode makes
possible more precise bearings than those obtainable with a quad or yagi. Under ideal field conditions, bearing accuracy is within one
degree. Meter deflection tells the user which way to turn to zero the meter. For example, a negative (left) reading requires turning the antenna left. This
solves the 180 degree ambiguity caused by the two zero crossings in each
complete rotation of the antenna system. The original L-Per had 4 receive channels with a crystal required for each. That limited its
versatility on ham bands. The newer LL models tuned 108-174 and 215-270 MHz.
Plans for the Happy Flyer DF, a similar
dual-pattern design, are on pages 106-113 of THRDFS. This homebrew unit can be
added to most VHF receiver models with a little minor electronic surgery. Both the L-Per and Happy Flyers units have
RF gain controls that can be used to gauge relative distance to the fox.
FM-based Dual-Antenna Sets
Dual-antenna add-on sets give sharp left-right indications similar to the
L-Per, but they can be used with ordinary narrowband FM hand-helds and scanners over a wide frequency range. The RDF set plugs into the antenna and earphone
connectors of the receiver; no modification of the receiver is required. These
"phase-front detector" sets use the time-difference-of-arrival (TDOA)
principle, which ignores amplitude variations in the signal. No attenuator is needed with them.
Examples of TDOA sets for VHF/UHF Amateur Radio include:
- Vector-Finder by National RF, Incorporated, reviewed in Homing In for July 1996.
- Foxhound by Ramsey Electronics (production discontinued). Be sure to read Design Problems and Fixes for Ramsey RDF Equipment at this site.
- Simple Seeker by David Geiser W5IXM, fully described in the ARRL Antenna
Compendium, Volume III and ARRL Handbook, 1995 and later Editions.
- Foxhunt Radio Direction Finder by Paul Bohrer W9DUU, more fully described in 73 Amateur Radio Today, July 1990. Circuit boards are available from FAR Circuits.
- SuperDF by BMG Engineering (production discontinued), reviewed in Homing In for November 1989.
The above sets all use left/right LED indicators or a zero-center meter to show deviation of the
signal from the bearing line. Discontinued products may be available on the used market.
Handi-Talkie add-ons that provide only a tone null indicating the front/back bearing line, but do not resolve the 180-degree ambiguity, are also available. These "bat-wing" sets are not recommended for radio-orienteering because they give you a 50/50
chance of going the wrong direction. However, there are modifications to improve their performance. For details, see "Sense The Right Way To Go With The HANDI-Finder®
" in this Homing In site.
Objects near the observer such as concrete/steel buildings, power lines, and
chain-link fences will distort the incoming TDOA wavefront and give directional errors. Even a dense grove of trees can have an adverse effect. It is always
best to take your bearings in locations which are as open and clear as possible, and
to take them from numerous positions for confirmation. Keep checking as you move along to "eyeball average" the readings. Some TDOA RDF
sets have a slow-response mode that aids the averaging process.
Because most TDOA sets use relative phase information only and pay no attention to signal level, they make it difficult
to gauge distance to the signal source. It is not uncommon to see a TDOA-using foxhunter walk over
the top of a concealed transmitter and walk away, following the opposite 180
degree null, because there is no indication of "You are here!" signal strength. To avoid being fooled,
keep moving and take bearings very frequently, verifying that you are still
approaching by carefully observing the left/right indication.
 TDOA sets were were plagued by cross-modulation from out-of-band signals when
used with extended-range hand-helds in the Portland Friendship Games
foxhunt. This can be a serious problem if there are strong VHF-FM transmitters
nearby and the receiver's front end has very broad response. The solution in this case was to use only vintage single-band handi-talkies with narrow-range front ends, such as the Icom IC-2AT, Tempo S1 and Radio Shack HTX-202.
TDOA sets were were plagued by cross-modulation from out-of-band signals when
used with extended-range hand-helds in the Portland Friendship Games
foxhunt. This can be a serious problem if there are strong VHF-FM transmitters
nearby and the receiver's front end has very broad response. The solution in this case was to use only vintage single-band handi-talkies with narrow-range front ends, such as the Icom IC-2AT, Tempo S1 and Radio Shack HTX-202.
Switched-pattern and TDOA sets have vertical antenna elements. They may not
perform well if the fox transmitters are horizontally polarized, depending on multipath
conditions at the site. IARU ARDF rules call for fox antennas to be
horizontal, and all are that way in Europe and Asia. But many clubs in the USA choose to use vertical whips on foxboxes for local hunts. It should be noted that experienced European foxhunters
claim that DFing vertically polarized signals in the woods is much more
difficult than DFing horizontal signals, because signal reflections are
more prominent with vertical polarization.
What About Loops?
Small loop antennas (example at right) are simple to build and easy to hand-carry or mount on a handi-talkie. Commercial units are available. Under the right conditions, they can give sharp directional nulls. However, they are inherently bi-directional, meaning that their directional indication has a 180-degree ambiguity. Their low sensitivity makes them unsuitable for weak-signal work and their nulls can be "filled in" by multipath signals.
My article " Loops: A Love/Hate Relationship" In this Homing In site treats the subject of directional loops in detail.
 Go to Radio-Orienteering in southern California -- Announcements of upcoming demonstration/practice sessions and results of recent local events
Go to International-Style Foxhunting Comes To The Americas -- How we're getting the ball rolling
Go to Latest Championship Foxhunting News -- Stories of recent national and international ARDF events and announcements of upcoming ones
Go to Electronic Scoring for ARDF -- What it is, how it works, and why it's better than pin punching
Go to Foxhunting for Scouts -- Let's get the kids involved
Go to Extenders Aid Handicapped Foxhunters -- A novel way to include persons with disabilities
 Back to the Homing In home page
This page updated 17 July 2025